You no longer need third-party software to record highlight-worthy plays in Counter-Strike 2, DOTA, or any other Steam game. Here’s everything you need to know about how to use Steam Game Recording.
Steam has a vast collection of games, including some that are great for creating click-worthy content. Whether you’re capturing funny moments in Among Us or pulling off impressive headshots in CS2, there are plenty of memorable moments worth recording.
How to use Steam Game Recording
However, it can be a tedious process to download third-party software and deal with complex video settings.
Valve has made it easier for content creators to record clips and competitive players to review their footage with Steam Game Recording, an in-app program that downloads gameplay.
It works similarly to software like NVIDIA GeForce and offers various options to record gameplay, share it with friends, or create footage.
How to participate in Steam Game Recording beta?

To test this program, which is currently in beta, you must enable Steam’s beta update from the settings.
- Start Steam and go to settings
- Click on “Interface”
- Select any option from “Client Beta Participation” besides no beta chosen
- Restart your device
Steam will take a few seconds to update once you have restarted your PC. This means an update has been installed on your device, making you eligible for the Steam Game Recording beta.
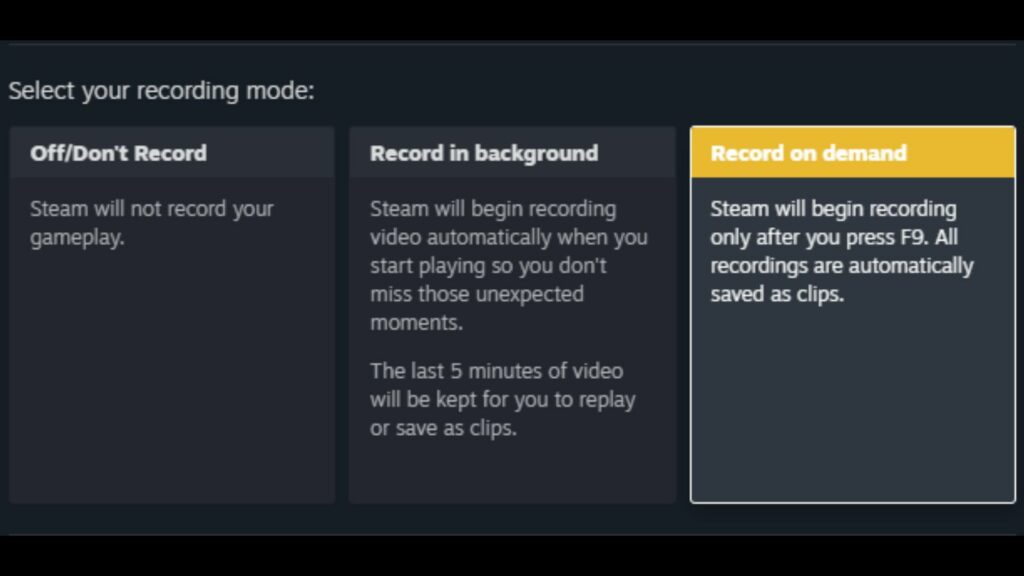
To find it, go back to Steam settings, and click on Game Recording from the menu. Here, you’ll get two options to record your gameplay. You can either start it from the get-go or select “Record on demand” to save shorter clips while you’re in-game.

Record in background has several customization options for video quality, hotkeys, and more. Go to the “Interface” and select the option in the middle to start recording as soon as you start any game on Steam.
Currently, you can only record up to 120 minutes of gameplay by pressing a hotkey that you can change from settings.
If you’re short on disk space, you can change the recording duration in settings. The software will show you how much space the recording will take up.

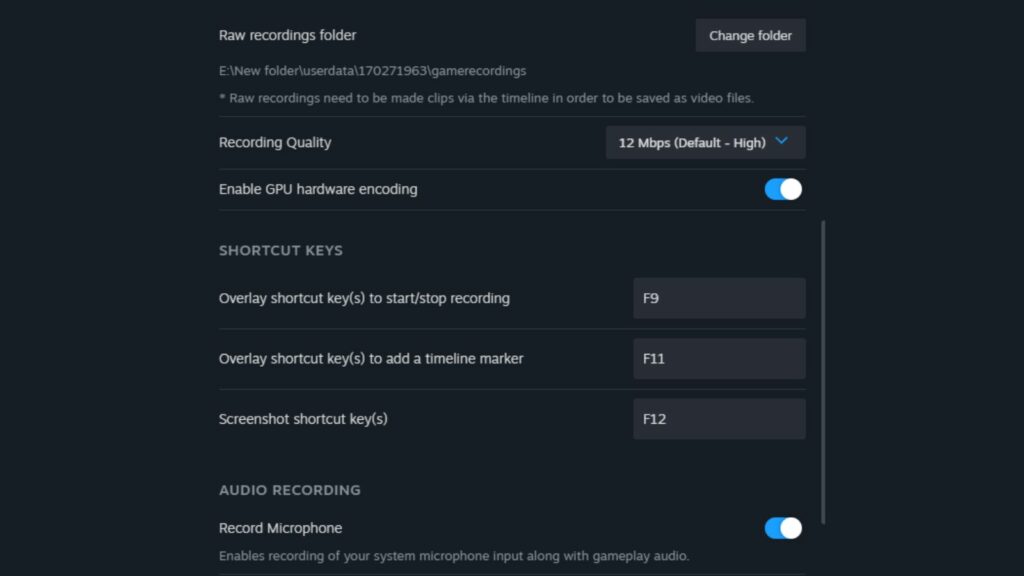
If you’re looking to record funny moments, make sure you have toggled on the “Record microphone” option. To keep your clips clutter-free, select “Game audio only” from the “Record audio from…” drop-down.
You can also adjust the download location and recording quality from in-app settings. For the highest quality, we recommend recording videos at 24 MBPs, especially if you’re looking to create content or highlights.
By default, the hotkey is set to Ctrl + F11, but you can easily change it to a single key to quickly start or stop recording.

There’s also a “Marker” feature to bookmark specific moments within long videos, allowing you to revisit them without having to watch the entire video. You can customize the marker key from the settings and set it to a single hotkey for easier access.
How to record gameplay in Steam software?
Once you’ve adjusted the settings, launch your preferred game and hit a hotkey to begin recording. A notification will pop up in the bottom right corner of your screen, confirming that the recording has started. When you’ve finished, press the stop recording hotkey to generate a clip.
To watch, edit, or share recording clips, press SHIFT+TAB to open Steam Overlay, and then click on the “View Clips” option at the top of the screen. All your recorded clips will appear on the screen.

- Right-click on a clip you want to share with a friend.
- Here, you’ll get options to crop, view, delete, or share it. Select share.
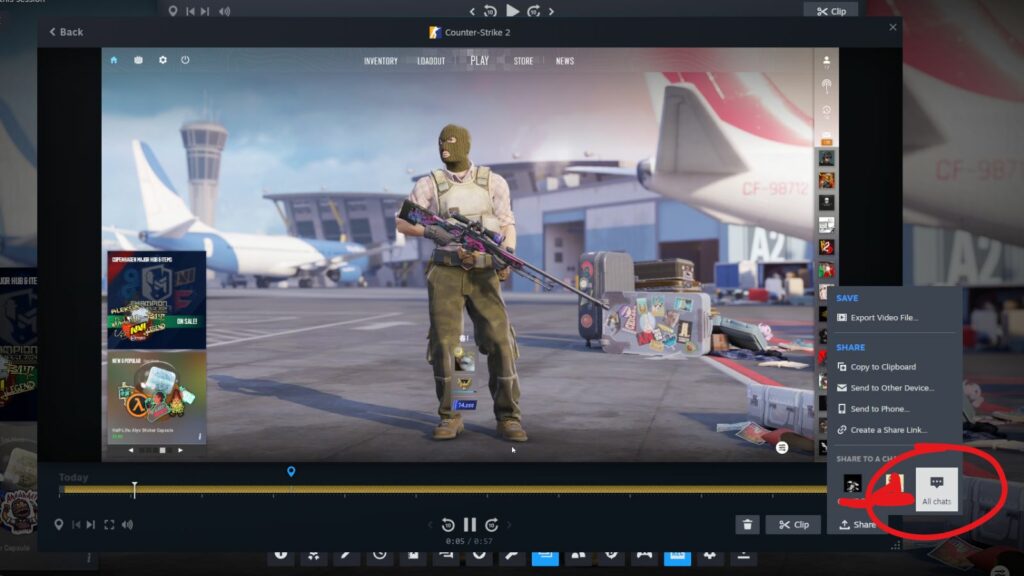
- Click on the share icon at the bottom right of the reel and select “All Chats” under the “Share to a Friend” option.
- Click on the name of a friend you want to share your clip with.
Before sharing, you can create a reel out of the timeline marker duration as well. Alternatively, you can download a clip to your computer by selecting “Export Video File” from the drop-down to create highlights and edits out of simple videos.
Steam Game Recording is a convenient way to capture clips, but currently, it can’t record Discord audio. This means it only captures your friends’ voices if they’re speaking in-game.
However, Steam Recording is in beta and already has a setting called “Game and Selected Program.” This suggests that Valve may add support for more applications in the future.
READ MORE: Best knife skins in CS2: Top 10 Counter-Strike 2 skins ranked

